Visit our official website APAJR Lab


Showing posts with label Website hacking and sql. Show all posts

Tuesday, 14 January 2014

Hack Websites Using Havij Automatic Sql Injector Tool [SQL Injection Tutorial] | .::APAJR::.

| |
0 comments


 Today i am writing an article on automatic sql injection that allow you to hack website using a software.

One of the popular tools is Havij, Havij is an advanced SQL injection tool which makes SQL Injection very easy for you, Along with SQL injection it has a built in admin page finder which makes it very effective.

Download Havij

                                                      
http://adfoc.us/22646341635698


Supported Databases With Havij


  • MsSQL 2000/2005 with error.

  • MsSQL 2000/2005 no error union based

  • MySQL union based

  • MySQL Blind

  • MySQL error based

  • MySQL time based

  • Oracle union based

  • MsAccess union based

  • Sybase (ASE)

Demonstration

Now i will Show you step by step the process of SQL injection.

Step1: Find SQL injection Vulnerability in a website and insert the string (like http://www.target.com/index.asp?id=123) of it in Havij as show below.(You Can Find Vulnerable WEbsite Using Automatic Scanner Like Acunetix Web Vulnerability Scanner 8. I will Show You How To Use It In My Next Article :D )


Step2: Now click on the Analyse button as shown below.


Now if the your Server is Vulnerable the information about the target will appear and the columns will appear like shown in picture below:


Step3: Now click on the Tables button and then click Get Tables button from below column as shown below:


Step4: Now select the Tables with sensitive information and click Get Columns button.After that select the Username and Password Column to get the Username and Password and click on the Get Table button.

Countermeasures: 

Here are some of the countermeasures you can take to reduce the risk of SQL Injection


  1. Renaming the admin page will make it difficult for a hacker to locate it
  2. Use a Intrusion detection system and compose the signatures for popular SQL injection strings
  3. One of the best method to protect your website against SQL Injection attacks is to disallow special characters in the admin form, though this will make your passwords more vulnerable to bruteforce attacks but you can implement a capcha to prevent these types of attack.   
Warning - This article is only for education purposes, By reading this article you agree that apajrlab is not responsible in any way for any kind of damage caused by the information provided in this article.


You Might also like : 
Read More

Monday, 30 December 2013

Blogger Notification Bar! | | .::APAJR::.

| |
0 comments


Looks like the new year is near! Out of the premium sets of design resources in our repository, we often share one of them as a freebie when the occasion is precious. There are many creative premium widgets, tools and plugins that we managed to develop this month for our regular clients and out of these I will be sharing just two such resources as a new year gift. They are: (1) Blogger Notification bar widget that you can see live on our blog at the top and (2) a Blogger Template entitled "Rajeev" which is far better than any of the templates we designed so far and makes us really jealous when we compare it to our current design of APAJR  blog itself!


Copyright

Bloggers and developers are hereby advised not to sell or redistribute the widget codes. You are also instructed not to remove MBT's watermark from the notification bar. Removing the watermark will break the entire code, leaving all your efforts in vain.
Premium version includes no watermarks. If you wish to buy the widget for Wordpress, Joomla or even Blogger Blogs, then you may kindly contact us via our services page.


What's New in it?

This notification bar works best by grabbing readers attention and helps you to focus readers towards important deals, announcements or any story. It functions on pure JQuery light-weight functions and is compatible with all major browsers including IE9.
Custom, unique and non-commercial plugins are always better then public designs. HelloBar is now too common and used everywhere and you may not like the limited design customizations offers provided by them along with their logo on the plugin. HelloBar also requests URL redirection and you need to register to use it. Scripts are stored at Hellobar server and the browser needs to send a request in order to display it on your blog or site. Really not appropriate if you don't like redirections and attribution links.
Blogger Notification bar requires no registration and provides far better design flexibility. The scripts are less than 6KB in size and fully hosted at your server.  You can change its look and theme to any color that may blend your layouts. Every single element is well structured and can easily be configured. A perfect tool to play with.
I will be always available to provide any help required here on this page.


Installing Notification Bar on blogger

You may follow the easy steps mentioned below in order to add the widget to your blogger blogs. Same procedure will work for any other platform like Wordpress.
  1. Go To Blogger > Template
  2. Backup your template
  3. Click Edit HTML
  4. Search for <head>
  5. Paste the following scripts just below it:


6.   Next search for ]]></b:skin>

7.   Just above it paste the following styles:


Make these Design changes if you wish:

  • To change the background color of the bar simply edit #2E2F2E
  • To change text color edit #cccccc
  • To change hyperlink color edit #FFFC00
  • To change anything else, just post me your query in the comment form below! :)


8.  Finally to make the bar appear just add the following code below <body>


9. Save your template and you are all done!

Creating links  

To create links inside the notification bar use the following code:


You must add the class='link' , which is required by the script.

Need help?

This plugin would work just fine if all the above steps are carefully followed. The steps are extremely easy to try. I just hope you find it worth using. If you ran into any technical problem just feel confident to leave your comments. I would love to help you out. Wishing you all the best of life buddies. Peace and blessings pals! :)
Read More

Saturday, 14 December 2013

Disable Copy Paste In Blogger - Secure Blog Contents | .::APAJR::.

| |
1 comments
                                                 

Hello friends, secure blogging is very important than effective blogging. Because, if you post good contents on your blog, some thieves steal them and posted on their blog with some extra contents. It will be down your blog traffic and unique content. So that I'm going to introduce this trick to prevent your blog from these kind of thieves. It is very simple. If you disable right click option or disable copy paste in blogger, no one will see your blog source code as well as they can't copy your blog contents. 
This problem may arises only on professional blogs. If your blog contains good high quality articles it happen. One and only solution for this problem with free of cost is disable the right click option or copy paste option. Copyscape is costlier. So it is not possible in more number of blogs. So that, you have to disable right click option. This java script code will help all bloggers to prevent copyright from blogs.

Steps To Disable Right Click Option In Your Blog

  • Login to your Blogger account
  • Go to dashboard and move on Layout section
  • Click on Add a gadget link and select HTML/JavaScript option
  • Copy the below code into HTML box
  • Click on the Save button.

<!-- START apajrlab disable copy paste-->
<script src='demo-to-prevent-copy-paste-on-blogger_files/googleapis.js'>
</script>
<script type='text/javascript'>
if (typeof document.onselectstart!="undefined" ) { document.onselectstart=new Function ("return false" ); } else{
document.onmousedown=new Function ("return false" ); document.onmouseup=new Function ("return true" ); } </script>
<!-- END apajrlab disable copy paste-->

That's all. You are Done!
Share this post if you like this trick. Share Your Experience with us by commenting below this post.
Read More

Wednesday, 11 December 2013

Auto Refresh Java Script For Blogger Blog (AUTO WEBPAGE RELOADER/ refresher )

| |
0 comments
Hi,friends , How is the day? Hope well. Ok, today I am going to show you (All of my blogger lover friends) how to set up the blogger blog for automatic refresh. Don't worry because the process is very easy and very useful for any medium (new / experienced) of blogger. No matter how much newcomer my blogger friends are , they will be able to set their blog for auto reloading within a very little amount of effort by the help of this article. Just follow the step by step instruction below to install the auto refresh script in your blog.

Step-1 # log into your blogger

As you are a blogger, you sure know how to log into the blogger. After that too, I am giving you the little instruction to log into the blogger account (Only for those who are in a very primary stage)
To log into your blogspot blogger account CLICK HERE
After you have clicked on the CLIKE HERE button above you will be on a page where you can login to your blogger account. Enter your email and password in the box provided there and hit the enter button or just click on the login button.
And than you will be in the blogger dashboard in no time.

Blogger login page

Blogger login page


Step-2 # Finding the layouts of your desired blog

After you logged into the blogger, you have to find the blog from the dashboard which you want to be reloaded automatically. Once you have found your desired blog, get into the layouts by clicking on the drop down menu on the dashboard of your blog. To understand better follow the following photo instruction below.
Finding the layout button from the dashboard


Step-3 # Finding the ADD A GADGET box in the layouts page

As you have already completed Step-2, so now, you are in the layout page of the blogger. Well , in the layout page you will notice lots of page functions box there. But as you have to add some Java script on your blog, so you have find and click on any ADD A GADGET box over there. Once again, you will find that there are a good number of box that shows ADD A GADGET link. Normally the question appears, which box will be the best to chose to install the Java. Here is the solution. As this Java script is not going to show any in page(sometime we use script to show new option in the page which is called in page appearance ) appearence, so my suggestion will be to chose the box which is near to the footer (near to foot of the page) of the page.

Finding the ADD A GADGET button


Step-4 # Java Script installation

After completing the Step-3 , I mean, after clicking the ADD A GADGET button of a box near to footer, a new window will appear, where you find a link saying HTML/JavaScript .
Click on that link and you will be redirected to another page where you will find 2 boxes ; one for title and other for content. Leave the title box blank and in the content box paste the following Java script and hit the save button. And thats all. Your auto refresh option has been installed successfully.


copy the JAVA SCRIPT bellow

1
2
3
4
5
6
7
8
9
10
11
12
13
14
15
16
17
18
19
20
21
22
23
24
25
26
27
28
29
30
31
32
33
34
35
36
37
<script>
<!--
/*
Auto Refresh Page with Time script
By JavaScript Kit (javascriptkit.com)
Over 200+ free scripts here!
*/
//enter refresh time in "minutes:seconds" Minutes should range from 0 to inifinity. Seconds should range from 0 to 59
var limit="00:59"
if (document.images){
var parselimit=limit.split(":")
parselimit=parselimit[0]*60+parselimit[1]*1
}
function beginrefresh(){
if (!document.images)
return
if (parselimit==1)
window.location.reload()
else{
parselimit-=1
curmin=Math.floor(parselimit/60)
cursec=parselimit%60
if (curmin!=0)
curtime=curmin+" minutes and "+cursec+" seconds left until page refresh!"
else
curtime=cursec+" seconds left until page refresh!"
window.status=curtime
setTimeout("beginrefresh()",1000)
}
}
window.onload=beginrefresh
//-->
</script>


Finding the place to paste JAVA


Finding HTML/Java
Finding HTML/Java
Putting the Java
Putting the Java

Setting the auto refresh time

In the line 11 of the above JAVA SCRIPT, you will notice some script saying "var limit="00:59" . Here you can set up the time for your desired auto refreshing of your page/blog. Use the Right side is for seconds and Left side is for minutes.


From the author

It will be an honor to hear any comment from you. Please share your story with us of installing auto refresh on your blog. Happy blogging.

Note : If Your Not able to copy script code Click Here to DOWNLOAD code

                                                             
http://www.mediafire.com/download/ttywx4cu499wn05/auto+reflesh+code+www.apajrlab.tk.txt

Read More

Thursday, 11 April 2013

HostGator Best Hosting Plans For Bloggers | .::APAJR::.

| |
2 comments


No matter whatever blogging platform or content management system (CMS) you may be using, the topic today will discuss reliable and affordable web hosting plans that you can purchase to kick start your blogging career. Advertisers and direct sponsors have started giving more value to blogs which are self hosted and produce quality content. Here we will discuss how to transfer your current domain to HostGator and at the same time buy a reliable hosting plan. We will also answer some frequently asked questions to keep things clean and clear.

Why HostGator?


For this I have written a detailed article that you can read here:


I wont tell you any technical details here like unlimited bandwidth, Disk space, sub domains etc. I would only highlight their excellent customer service. You always need active real support from your web hosting company so that in times of technical need you may not feel helpless. Whether you are a customer or just a passing visitor the agents there are always available to give free help and suggestion.

Web Hosting companies are examined and tested by Online testing organizations and critics every year. HostGator has amazingly moved ahead of everyone in the world of web hosting for speed, reliability and support for over 9 consecutive years. You can Read the long list of awards they have achieved so far at their homepage.

I must tell you that these awards matter a lot because they are reviews collected after detailed research and they are not paid reviews. Therefore their authenticity is always respected and can't be ignored.

I researched for almost a week before choosing our web hosting company. Almost every professional blogger, designer and developer that I came across used HostGator as his web host. I read their reviews and read several forums before making my mind to choose HostGator to provide us with a storage space where we could save our resources and tools. Its one month now since I first joined HostGator and the experience so far has been outstanding. I am learning and experiencing new technologies and can easily apply them to the blog because all latest web technologies and development tools are fully supported by HostGator Control Panel.

They also provide free SEO software to monitor and track performance of your blog along with free $100 Adword and $100 Yahoo Ads campaign if you live in USA.

What can I create after buying a hosting plan?


You can create almost anything using the softwares found in HostGator control Panel (Cpanel)


  1. Blog Software  eg: Wordpress, LifeType


  2. Forum Software


  3. Gallery Software


  4. Guestbook Software


  5. Website Builder


  6. Mail Software  eg: xyz@facebookcom


  7. Social Networking Software   eg: Facebook, mySpace


  8. Wiki Software


  9. Survey Software


  10. Billing Software


  11. Chat Software


  12. Directory Software


  13. eCommerce Software


I am using Free Blogger, How would it effect me?


You can continue using blogger the same way you did before. You will write and access your posts from blogger.com dashboard as you normally do. Everything would remain the same except that now you don't need to save your style sheets, scripts and web pages on third party servers. You will have your own allocated disk space at HostGator which you can use to create unlimited numbers of sub domains like a Forum, tool or services Page. Your blog would load much faster than before and would grow more popular amongst the readers and daily visitors.

You can create a separate webpage for any purpose you may like. For example: You can create a uniquely designed webpage for each of your Ebook promotion or any other product promotion. You can do everything that pro bloggers have been doing so far.

I am using Free Wordpress, How would it effect me?


You can easily transfer your posts to your self hosted Wordpress blog with the help of agents. HostGator guys provide great support for Wordpress and the community is always more  helpful in your case. You will have all the privileges that I explained for a blogger user.


Will Domain Migration Effect my Ranking or Traffic?


Surely not! You can migrate your domain from your current registrar to HostGator within a week and during this time your website would work just normal. It wont stop working or show a no server found error. The transfer never effects your traffic or ranking. Since you are not changing your domain address and just the company who owned your domain therefore all your backlinks will still point to you and you can continue enjoying the PageRank Juice.

However if you are using Blogger.com then your website will go down for just 24 hours till your DNS settings are propagated successfully. We had informed our readers when MBT was about to Go down for a day. Luckily things proved more easy then we expected thanks to the sincere help of HostGator Agents.

How much will it cost me?


It will cost you less than $50 per year! Imagine you waste more than $100 per month on your stomach and accessories, a small budget can build your entire future career. I have share below discount Coupon codes that you can use to get up to 25% discount on your hosting plan.


Ready To Become a Webmaster?


If you have made up your mind just like me and wish to start experiencing the lifestyle of a webmaster for less than $50 per year then the details below is what you must understand and apply the sooner possible:

HostGator Hosting Plans


There are three business plans that HostGator offers which are:

1. Hatchling Pan   (The plan that we use)


  • Single Domain


  • UNLIMITED Disk Space


  • UNLIMITED Bandwidth


  • Shared SSL Certificate


  • Starting at $3.96/month   Which means $48 per year   This will decrease further after applying our 25% discount coupon


2. Baby Plan


  • UNLIMITED Domains


  • UNLIMITED Disk Space


  • UNLIMITED Bandwidth


  • Shared SSL Certificate


  • Starting at $6.36/month  which means $76 per year. Would further decrease with Discount coupon


3. Business Plan  (Obviously Not for bloggers)


  • UNLIMITED Domains


  • UNLIMITED Disk Space


  • UNLIMITED Bandwidth


  • FREE Private SSL & IP


  • FREE Toll Free Number


  • Starting at $10.36  Discount Coupon Applies


I use Hatchling plan for running this blog and I will highly recommend it if you are planning to run just one domain on a single HostGator account. If you have more than one blogs/domains than Baby plan is a much profitable hosting plan for you. We are planning to launch a new blog so we will be upgrading to baby plan because we can run two blog networks on a single account for less than $76 per year which is just amazing. This amount will further decrease thanks to discount coupons.

Conclusion:

Use Hatchling if you want to run just one Domain

Use Baby if you are planning to open more domains in future.

For How Many Years Should You Register?


Register your domain for no less than 3 years. If your register for Less than three years suppose 1 year or 2 years, then it would cost you more because higher discounts are given only when you register for a minimum of three years. We registered our blog for 3 years and I advise the same for you. Higher Discount Coupon codes do not apply for less than three years.

Once your registration expires after three years, you can then easily renew it. They wont terrify you with deadlines.

25% Discount Coupon Codes


If you register now using the coupon code below during the sign up process you will get 25% discount on any hosting plan you choose. You can enjoy free first 7 months with the following discount codes:

Click this link and try it.


Read More

Guide to change your [blogspot.com Or wordpress.com] to dot.tk in Blogger | .::APAJR::.

| |
2 comments
Are you publishing your blog with Blogger.com? Are you feeling that your long domain name like your-blogname.blogspot.com, giving you bad reputation at many points of view? If your answer is yes! Then you came to right place and read out my post.

Why should I change to custom domain?


Search engines except Google, rest of all will never result your blogspot well at their listing. Social networking sites don’t like your blogspot.com tag when compared with top level domain. They don’t love to back link you. Moreover, the blogspot.com domains are blocked by some Internet service providers including China. You can also get custom e-mail like admin@your-domain.com with Google Apps. So this time, I am posting step by step guide to set up a custom domain using Dot.tk.

Guide to set up a Dot Tk custom domain using free DNS service:


Registering Dot Tk Domain:


Step-I:


    1. Go to Dot.tk website.

    2. Enter your preferred Dot Tk domain name and click Go. If entered domain is available, you will be promoted for further steps.

Dot Tk domain registration panel


    1. Now it shows availability of your domain.  For free domain you need to produce minimum of 25 hits per 90 days. Free domain has same services as paid domain. Select your choice and move on to next step.

Dot tk sign up


  1. Enter your blogspot URL and set registration length as 12 months. Now sign up with Dot Tk. Here you have to verify your Dot Tk account by email or you can also use social Networking accounts like facebook, yahoo, flicker etc.

Dot Tk settings in Blogger:


Step-II:


    1. Log on to your blogger account.

Adding custom domain


    1. Go to Settings and find Publishing option in your dashboard. Now click on Add a Custom Domain. You will be prompted to buy a domain for your blog.

Blogger custom domain settings


  1. Simply click on Switch to advanced settings. Then enter your Dot Tk domain with www in the place of www.filmyhub.tk (as shown in the picture). Now you have to verify domain ownership by adding two CNAME records. For this, click on Settings instructions. You will be landed to a page that having dynamically generated CNAME valus with detailed set up instructions.

DNS Configurations in Dot TK:


Step-III:


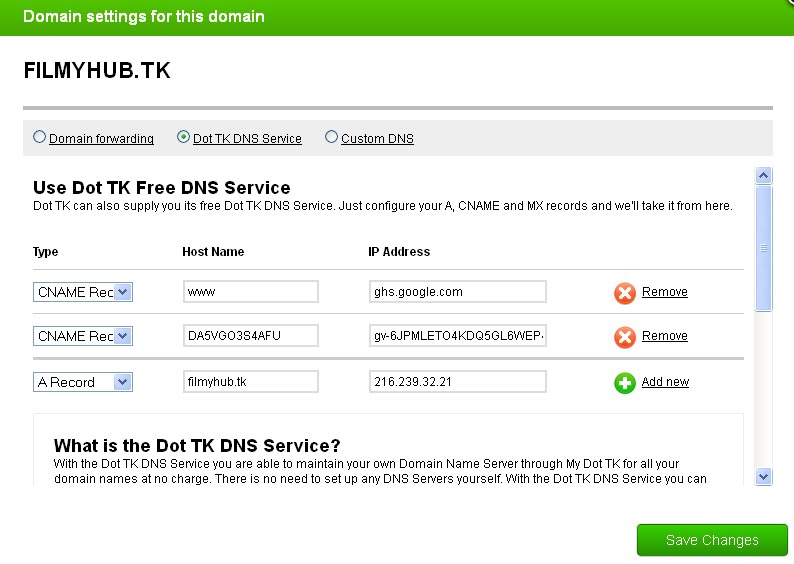
    1. Now log on to your Dot Tk account and click on Domain Panel. It gives the list of your Dot Tk Domains. Now, click on Modify option to configure DNS Settings for your domain.

DNS settings in DOT TK


    1. Here, you will get a pop up window of Domain settings. Select Dot TK DNS Service and configure your DNS settings like above shown screenshot according to your domain name. You will find dynamically generated CNAME values in below image.

DNS settings in Blogger


  1. For the first CNAME, enter Host Name as "www" and IP address as "ghs.google.com". It is fixed for any blog. Second CNAME record needs dynamically generated values. It means Host name with dynamically generated name (which is highlighted in blue) and IP Address with dynamically generated value like "gv-xxxxx.domainverify.googlehosted.com" (which is highlighted in pink). These fields are different for different blogs. Do not forget  to select record type as CNAME record.

  2. To make your naked domain available, you have to add A record with following details. select record type as A record, then fill Host Name field with your dot tk domain without www (example: filmyhub.tk ) and IP address as 216.239.32.21

  3. Before you move onto next step, wait about 30 min or an hour for your DNS settings to activate.

Saving Custom Domain settings in Blogger:


Step-IV:


    1. Again go to advacned settings that configured in second step under publishing and save them. If you get any error, come back after some time and save settings.

custom domain settings in Blogger


  1. Once you are done with saving, under publishing edit your custom domain and set redirection option by putting tick mark as shown in picture.

  2. If you have any trouble in following any step, put a comment that helps me to catch you back.
Read More

Wednesday, 3 April 2013

Most Popular Free Web Hosting Service | .::APAJR::.

| |
0 comments


When you start blogging we often do not require to buy space or have our own domain on the internet. This is mainly because some people blog just for fun and are not serious about making it a profession or even make money out of it. Ofcourse there are options like blogspot.com and wordpress.com but there are quite a few free website hosting services. I think these websites would be quite useful for designers and programmers to test their products

Here is a list of the top Free Web Hosting services available on the net. As we all know a free web host usually has bad uptime and bad disk space and bandwidth limits. Recently there has been an en flux of new free web hosts that offer the same or better as most premium ones. Here are the best ones so far.
Jimdo  


Jimdo is a free service which is ideal for people who are looking to sell things online.


  • Jimdo allows with free account storage space upto 500 MB.

  • It also supports Photo galleries, widgets and also a store for selling things from your website.

  • One good point about this hosting service when compared to other free services is that it allows adding Flash on it.


110mb  


110mb as its URl suggest allows free hosting upto 110 MB.


  • 110mb.com allows data exchange of upto 100 GB along with the 110 MB storage space.

  • It does not allow WordPress, Drupal or MySQL databases.

  • It is one of the few free services allowing unique domains!


This Hosting service tops the poll in my opinion. They offer so much for the free user, its incredible and best of all they have very good uptime with unlimited add-on domains.

Gives you:

  • 5 GB disk space per account with unlimited account per users

  • 50 GB of monthly data transfer


Gives you:

  • 5.5 GB disk space

  • 200 GB of monthly data transfer


Gives you:

  • 250 MB disk space

  • 6 GB of monthly data transfer


Gives you:

  • 350 MB disk space

  • 15 GB of monthly data transfer


000Webhost

Gives you:

  • 1.5 GB disk space

  • 100 GB of monthly data transfer


ByeHost

Very Good solid hosting service with instant activation, so no waiting. Uptime is good and they offer excellent customer service, definitely one to look at

ByeHost Gives You:

  • Disk Space: 5500 MB

  • Data Transfer: 200gb/month


Very reliable host with unlimited email features.Good help and support.

Mister Host Gives You:

  •  Disk Space: 250 MB

  • Data Transfer: 5gb/month


Gives you:

  • 150 MB disk space

  • 4 GB of monthly data transfer


Gives you:

  • 150 MB disk space

  • 4 GB of monthly data transfer


Webs is meant for very limited users but is a free hosting service.


  • Webs allows upto 40 MB disk space and 500 MB monthly data transfer.

  • It also supports a single FTP account.

  • Webs.com does not support MySQL databases and also programming languages.


Footnotes


This list of 5 website hosting services are really useful. I hope this list can help you start your first website. I’m sure there are more options lurking somewhere out there, but these are the best that I could find within a few days of searching.
If you know of other good alternatives, please don’t hesitate to share using the comments below.


If you like my this post then kindly Share with your friends and groups and hit like
Read More

Sunday, 17 March 2013

Access Any Website Or Forum Without Registering [TUT] | .::APAJR::.

| |
1 comments
Let's come straight to the point !

Visit any forum or website to find something useful and they will ask you to register. Every time a forum asks me to register, I simply close the site. You would probably do the same. But this time, lets face it.

Before I begin, you should know how things work. All websites and forums will block unregistered users, but they won?t block Google Bot. What we will do is to switch our User Agent to that of Google Bot and freely browse any website or forum without registering.

First grab the add-on for Firefox called ?user agent? Here and install it. Now go to Tools > User Agent Switcher > Options and then again to Options.


user agent switcher options

Select User Agent from the left sidebar and click Add. Now in the description field type:


crawl-66-249-66-1.googlebot.com


and in user agent field type:

as shown in the screenshot below.


adding a new user agent

Select Google Bot as your User Script by going to Tools > User Agent Switcher.


selecting google bot as user agent

Now browse any website or forum without registering. Alternatively you can also check out BugMeNot, it is a free online service where people share login information of thousands of websites and forums. Enjoy!
Read More

List of Google ASP Dorks here ! | .::APAJR::.

| |
1 comments


inurl:”add.asp?bookid=”
inurl:”add_cart.asp?num=”
inurl:”addcart.asp?”
inurl:”addItem.asp”
inurl:”add-to-cart.asp?ID=”
inurl:”addToCart.asp?idProduct=”
inurl:”addtomylist.asp?ProdId=”
inurl:”adminEditProductFields.asp?intProdID=”
inurl:”advSearch_h.asp?idCategory=”
inurl:”affiliate.asp?ID=”
inurl:”affiliate-agreement.cfm?storeid=”
inurl:”affiliates.asp?id=”
inurl:”ancillary.asp?ID=”
inurl:”archive.asp?id=”
inurl:”article.asp?id=”
inurl:”aspx?PageID”
inurl:”basket.asp?id=”
inurl:”Book.asp?bookID=”
inurl:”book_list.asp?bookid=”
inurl:”book_view.asp?bookid=”
inurl:”BookDetails.asp?ID=”
inurl:”browse.asp?catid=”
inurl:”browse_item_details.asp”
inurl:”Browse_Item_Details.asp?Store_Id=”
inurl:”buy.asp?”
inurl:”buy.asp?bookid=”
inurl:”bycategory.asp?id=”
inurl:”cardinfo.asp?card=”
inurl:”cart.asp?action=”
inurl:”cart.asp?cart_id=”
inurl:”cart.asp?id=”
inurl:”cart_additem.asp?id=”
inurl:”cart_validate.asp?id=”
inurl:”cartadd.asp?id=”
inurl:”cat.asp?iCat=”
inurl:”catalog.asp”
inurl:”catalog.asp?CatalogID=”
inurl:”catalog_item.asp?ID=”
inurl:”catalog_main.asp?catid=”
inurl:”category.asp”
inurl:”category.asp?catid=”
inurl:”category_list.asp?id=”
inurl:”categorydisplay.asp?catid=”
inurl:”checkout.asp?cartid=”
inurl:”checkout.asp?UserID=”
inurl:”checkout_confirmed.asp?order_id=”
inurl:”checkout1.asp?cartid=”
inurl:”comersus_listCategoriesAndProducts.asp?idCa tegory =”
inurl:”comersus_optEmailToFriendForm.asp?idProduct =”
inurl:”comersus_optReviewReadExec.asp?idProduct=”
inurl:”comersus_viewItem.asp?idProduct=”
inurl:”comments_form.asp?ID=”
inurl:”contact.asp?cartId=”
inurl:”content.asp?id=”
inurl:”customerService.asp?TextID1=”
inurl:”default.asp?catID=”
inurl:”description.asp?bookid=”
inurl:”details.asp?BookID=”
inurl:”details.asp?Press_Release_ID=”
inurl:”details.asp?Product_ID=”
inurl:”details.asp?Service_ID=”
inurl:”display_item.asp?id=”
inurl:”displayproducts.asp”
inurl:”downloadTrial.asp?intProdID=”
inurl:”emailproduct.asp?itemid=”
inurl:”emailToFriend.asp?idProduct=”
inurl:”events.asp?ID=”
inurl:”faq.asp?cartID=”
inurl:”faq_list.asp?id=”
inurl:”faqs.asp?id=”
inurl:”feedback.asp?title=”
inurl:”freedownload.asp?bookid=”
inurl:”fullDisplay.asp?item=”
inurl:”getbook.asp?bookid=”
inurl:”GetItems.asp?itemid=”
inurl:”giftDetail.asp?id=”
inurl:”help.asp?CartId=”
inurl:”home.asp?id=”
inurl:”index.asp?cart=”
inurl:”index.asp?cartID=”
inurl:”index.asp?ID=”
inurl:”info.asp?ID=”
inurl:”item.asp?eid=”


inurl:”item.asp?item_id=”
inurl:”item.asp?itemid=”
inurl:”item.asp?model=”
inurl:”item.asp?prodtype=”
inurl:”item.asp?shopcd=”

inurl:”item_details.asp?catid=”
inurl:”item_list.asp?maingroup”
inurl:”item_show.asp?code_no=”
inurl:”itemDesc.asp?CartId=”
inurl:”itemdetail.asp?item=”
inurl:”itemdetails.asp?catalogid=”
inurl:”learnmore.asp?cartID=”
inurl:”links.asp?catid=”
inurl:”list.asp?bookid=”
inurl:”List.asp?CatID=”
inurl:”listcategoriesandproducts.asp?idCategory=”
inurl:”modline.asp?id=”
inurl:”myaccount.asp?catid=”
inurl:”news.asp?id=”
inurl:”order.asp?BookID=”
inurl:”order.asp?id=”
inurl:”order.asp?item_ID=”
inurl:”OrderForm.asp?Cart=”
inurl:”page.asp?PartID=”
inurl:”payment.asp?CartID=”
inurl:”pdetail.asp?item_id=”
inurl:”powersearch.asp?CartId=”
inurl:”privacy.asp?cartID=”
inurl:”prodbycat.asp?intCatalogID=”
inurl:”prodetails.asp?prodid=”
inurl:”prodlist.asp?catid=”
inurl:”product.asp?bookID=”
inurl:”product.asp?intProdID=”
Read More

Saturday, 16 March 2013

Add Facebook page into blogger blog | .::APAJR::.

| |
2 comments
facebook page
Here I am going to show you how to create and add the Facebook fan page in to the blogger blog. just follow the simple steps to add Facebook fan page inside blogger blog

1. Create the Facebook page here

2.Open that link and add all the information and add your site details and add fan page picture.

3.Now from the admin penal go to manage and select EDIT PAGE.

facebook page 2

4.Now just click on resources and in resources click on “use social plugins ”

facebook page 3
5. Now just add the LINK of your Facebook page. (I have highlighted the place with yellow color where you need to add your Facebook fan page’s link )

facebook page 6

6. Add your Facebook LINK and set your page like this.

facebook page 7

7. After setting your fan page widget appearance just click on Get Code.

8. Now you can see that you got 2 codes see in the figure.

facebook page 8
9. Now login to your blogger account and go to dashboard > Design > Edit HTML and find <body> (find it using ctrl + f)

now just below <body> paste the 1st code and save your template.

And add the second code where you want to show your Facebook fan page.

Don’t forget to like our page..........
Read More
Powered by Blogger.